Please note this is an actual recipe used by an actual human.
In the blog I go over my negative experience trying to use some of the recipes floating around out there on the internet for Paska. I hope that by using my modified recipe you get the results of a good bread. For whatever reason people seem to be getting very bad results of online Paska recipes. My theory in this is that the ones floating around on the internet are "cut down" versions of bakery recipes. They were originally used for mass production of bread in a bakery setting. Sometimes when trying to get a "home cook" version of a professional recipe the ratios get off course when industrial recipes are divided many times. I am of the mindset that the flour ratio is off in many of the online recipes such ans Martha Stewart's. It's just a theory, but the modified recipe I have here is intended for home cooks it isn't a scaled back bakery recipe.
Let us begin...
Dear Martha Stewart.... what the heck is wrong with your Paska Recipe??????? I was enamored of Martha's recipe after watching a video of how the recipe is made, and for the first time seeing some of the bread designs being created for the top of a Paska. I thought "YAH that's right I can do this!!!"
You can watch the video here:
http://www.marthastewart.com/926601/decorating-ukrainian-easter-bread-part-1#993486
And View the recipe I followed here:
http://www.marthastewart.com/344718/easter-paska
The video features a dough that is light and fluffy and smooth... after I followed the recipe I knew I was in trouble based on the texture of the dough.... my dough was a lump of unworkable mess, I baked it anyway and while it did hold its shape very well, it did not rise the way Paska rises, did not turn the deep brown color on top, and tasted pretty much like a rock.


Steps:
#1. Combine water and 1 tsp sugar and yeast let stand 5min
#2. Meanwhile scald your milk and let cool for 5 min
**Side note. I have been told time and time again traditional paska contains saffron... I hate to tell you this but most saffron on the market today is really bad quality or not actual saffron at all and is only going to add color to your bread. However if you do insist on spending and extra $9 to put a pinch of saffron in the bread it is added to the milk before you scald it. The heat will bring out the taste and color of the spice.
#3. Add milk, bread flour and 1/2 cup all-purpose flour to yeast mixture, mix till smooth cover with a damp cloth or plastic wrap, and let stand 30 min till the mixture is bubbly, gooey and stringy.
#4. Meanwhile combine eggs, white and brown sugar, rum, vanilla, lemon zest, and beat well till bubbles form in the mixture 3 - 5 min BY HAND (go figure people still do that)
#5. Melt your butter and set aside to let cool.
#6. After the 30 Min for the yeast mix has passed, add the goopy yeast mix to your wet egg mix combine with your hand till well mixed slowly incorporate your butter while doing this, then your cranberries or raisins (optional)
#7 Add and incorporate the 4 cups of all-purpose flour one cup at a time till you hit 3 cups. Then dump the additional cup on the surface you will be kneading the bread on, and kneed for 15 min. Your dough should be smooth and not too sticky to work with. If you dough is too sticky you need to add flour up to an additional cup. Do this slowly and only as needed if you have to add more than an additional cup of flour to get the dough right you it will affect the taste and texture of the bread.
#8. Oil a bowl with canola oil, and place the dough in the bowl, oil the top of the dough and place oiled plastic wrap or a damp cloth over the bowl let rise in a warm place for 2 hours (note if you put a cloth over the bowl the dough may rise and stick to the cloth so plastic is advised)
#9. After 2 hours pass punch the dough down again, spray an oven safe pot with non-stick cooking spray generously, you should have room in the pot for the dough to double in size and a bit extra... if you don't have a high enough one, line the sides with baking parchment and spray with nonstick spray, so that you have an overhang of paper above the pot the bread can rise to and still be contained.
#10. Cut off one third of the dough to shape decorations for the top. Place the remaining dough in the bottom of the pot and decorate the top of the bread with shaped dough. If you are doing more complicated patterns secure your dough with tooth picks and also remember to keep your designs small as anything you put on the bread will double in size after it rises again.
#11. Glaze the bread with an egg white wash to keep it moist. Allow the bread to rise in the pot till doubled in size (about an hour)
#12. Bake at 350 for 55 minutes after the first 20 Min pull your bread out and cover the top with foil to prevent over browning.
#13. Remove bread from oven and immediately dump out of pot. The top of the bread should be fairly sturdy and you can let the bread sit on the decorated part while it cools a bit if you are afraid it is too top heavy but if it stands upright alright then you are good to let it cool that way.
GOOD LUCK!!!


 To also note I've made some improvements to this recipe (It's already changed above). In 2017 I'm having much better results with it so if you are using my modified recipe it should turn out good for you. Please do stay away from Martha's recipe as well as the standard one on the internet, I've heard A LOT of internet feed back surrounding these recipes from people who have spent hours baking bread and the consensus is the flour ratios are off. Most people get bread that is simply to hard to eat after hours of work which is really sad. Mine should work out just fine for you just make sure you are using the right yeast Dry Active Yeast (none of that "quick rise" stuff Paska takes time and rise of the bread is a very big part of the process) Hopefully if you are starting out you can skip the part where you get a bad recipe. That is my hope for you.

In the blog I go over my negative experience trying to use some of the recipes floating around out there on the internet for Paska. I hope that by using my modified recipe you get the results of a good bread. For whatever reason people seem to be getting very bad results of online Paska recipes. My theory in this is that the ones floating around on the internet are "cut down" versions of bakery recipes. They were originally used for mass production of bread in a bakery setting. Sometimes when trying to get a "home cook" version of a professional recipe the ratios get off course when industrial recipes are divided many times. I am of the mindset that the flour ratio is off in many of the online recipes such ans Martha Stewart's. It's just a theory, but the modified recipe I have here is intended for home cooks it isn't a scaled back bakery recipe.
Let us begin...
Dear Martha Stewart.... what the heck is wrong with your Paska Recipe??????? I was enamored of Martha's recipe after watching a video of how the recipe is made, and for the first time seeing some of the bread designs being created for the top of a Paska. I thought "YAH that's right I can do this!!!"
You can watch the video here:
http://www.marthastewart.com/926601/decorating-ukrainian-easter-bread-part-1#993486
And View the recipe I followed here:
http://www.marthastewart.com/344718/easter-paska
The video features a dough that is light and fluffy and smooth... after I followed the recipe I knew I was in trouble based on the texture of the dough.... my dough was a lump of unworkable mess, I baked it anyway and while it did hold its shape very well, it did not rise the way Paska rises, did not turn the deep brown color on top, and tasted pretty much like a rock.
My First Paska 2014
I guess if I didn't want to eat it, it isn't the worst looking
creation that I have had come out of my kitchen, but I was extremely disappointed
in the bread. The bread in an Easter basket represents Christ himself, so it is
something you really don't want to turn out poorly. Part of the reason I had
such an issue with the recipe I think is because most bread recipes are not
traditional by hand recipes anymore, and while you would think that you can beat a loaf
of bread as good as any tin can mixer.... some recipes you just can't get the
same texture with no matter how many times you punch the snot out of it.
I came to the conclusion that if I did not get a pretty
looking bread I could live with it, after all I'm not experienced in making it, so
I can't expect the thing to be a work of art on the first go... but I couldn't
put up with something in my basket that tasted bad so I shrugged my shoulders
took a picture and started again.
Paska Fail oh well
The bread actually requires quite a bit of work compared
with the breads I usually attempt. The dough is temperamental, you need to cook
it in a really high pan, and it rises.... a lot so the chances of it spilling
over the pan are pretty good. Along with all these complications, there are the
superstitions that go along with making the bread. Normally I will bow to
superstition out of habit, but when it comes to baking I'm pretty confident so I
thought I could get away with doing what I wanted so I ignored the superstitions on my first attempt. On my 2nd attempt at making
the bread I decided to do it the way superstition says you do it and see if my
luck improved.
First I had to look up a new recipe and I came across this
one:
Classic Paska Recipe:
Makes 1 large Ukrainian Easter Bread
Prep Time: 20 minutes
Cook Time: 55 minutes
Total Time: 1 hour, 15 minutes
Ingredients:
- 1/2 teapoon plus 1/2 cup sugar
- 1/2 cup lukewarm water
- 1 package active dry yeast
- 1 1/2 cups milk
- 2 1/2 cups plus 5 cups all-purpose flour
- 3 beaten large eggs
- 1/3 cup melted butter
- 1 1/2 teaspoons salt
I decided that both this recipe and Martha's were nothing like what I
wanted, and decided to make some changes cutting out the worst parts of both,
and adding what was needed. In Martha's recipe, I didn't like the fact that it
called for 8 egg yolks. I don't mind making an egg white omelet to use them up,
but I generally look at recipes that use a lot of one part of an egg as
wasteful.
Here is the Recipe I came up with:
Ebony's modified Paska Recipe
· 1 teaspoon white
sugar for the yeast
· 1/2 cup White sugar
sugar
· 2 heaping TBSP brown
sugar
· 1/2 cup lukewarm
water
· 1 package active dry
yeast
· 1 1/2 cups milk
· 2 cups bread flour
· 4 and 1/2 cups
all-purpose flour
· 3 beaten large eggs
· 2 TBSP Spiced Rum
· 2 TSP Vanilla
· The zest of half a
lemon
· 1 cup dried
cranberries
· 1/3 cup melted
butter
·
1 1/2 teaspoons salt
Steps:
#1. Combine water and 1 tsp sugar and yeast let stand 5min
#2. Meanwhile scald your milk and let cool for 5 min
**Side note. I have been told time and time again traditional paska contains saffron... I hate to tell you this but most saffron on the market today is really bad quality or not actual saffron at all and is only going to add color to your bread. However if you do insist on spending and extra $9 to put a pinch of saffron in the bread it is added to the milk before you scald it. The heat will bring out the taste and color of the spice.
#3. Add milk, bread flour and 1/2 cup all-purpose flour to yeast mixture, mix till smooth cover with a damp cloth or plastic wrap, and let stand 30 min till the mixture is bubbly, gooey and stringy.
#4. Meanwhile combine eggs, white and brown sugar, rum, vanilla, lemon zest, and beat well till bubbles form in the mixture 3 - 5 min BY HAND (go figure people still do that)
#5. Melt your butter and set aside to let cool.
#6. After the 30 Min for the yeast mix has passed, add the goopy yeast mix to your wet egg mix combine with your hand till well mixed slowly incorporate your butter while doing this, then your cranberries or raisins (optional)
#7 Add and incorporate the 4 cups of all-purpose flour one cup at a time till you hit 3 cups. Then dump the additional cup on the surface you will be kneading the bread on, and kneed for 15 min. Your dough should be smooth and not too sticky to work with. If you dough is too sticky you need to add flour up to an additional cup. Do this slowly and only as needed if you have to add more than an additional cup of flour to get the dough right you it will affect the taste and texture of the bread.
#8. Oil a bowl with canola oil, and place the dough in the bowl, oil the top of the dough and place oiled plastic wrap or a damp cloth over the bowl let rise in a warm place for 2 hours (note if you put a cloth over the bowl the dough may rise and stick to the cloth so plastic is advised)
#9. After 2 hours pass punch the dough down again, spray an oven safe pot with non-stick cooking spray generously, you should have room in the pot for the dough to double in size and a bit extra... if you don't have a high enough one, line the sides with baking parchment and spray with nonstick spray, so that you have an overhang of paper above the pot the bread can rise to and still be contained.
#10. Cut off one third of the dough to shape decorations for the top. Place the remaining dough in the bottom of the pot and decorate the top of the bread with shaped dough. If you are doing more complicated patterns secure your dough with tooth picks and also remember to keep your designs small as anything you put on the bread will double in size after it rises again.
#11. Glaze the bread with an egg white wash to keep it moist. Allow the bread to rise in the pot till doubled in size (about an hour)
#12. Bake at 350 for 55 minutes after the first 20 Min pull your bread out and cover the top with foil to prevent over browning.
#13. Remove bread from oven and immediately dump out of pot. The top of the bread should be fairly sturdy and you can let the bread sit on the decorated part while it cools a bit if you are afraid it is too top heavy but if it stands upright alright then you are good to let it cool that way.
GOOD LUCK!!!
I set to making my bread using my modified version of the
two recipes and going by superstition. You are not allowed to have any negative
thoughts when making the bread so I cleared my mind, and thought about my
friends and family and happy Easter memories I had shared with them. This
ensured my bread would be sweet and taste good. I did not sit down, because the
superstition is that if you sit down while the bread is rising the dough will collapse....
ok I did sit down a bit and I am convinced that is why it has a little bit of a
sag in the top.
Over all, I was happy with the result. This dough didn't
hold its shape as good as the other one but it tastes great!!!! Part of the
shape issue I had with it was that I used a smaller pot to bake it in and it
overflowed the top a bit in the baking process. These are things I can chalk up
to a learning experience, and do better with next time I make the bread. For now
I have my Easter bread. The decorations I chose to put on the bread were the infinity
ring which is a two strand twist that goes around the border of the bread, and
a three strand braided cross to represent the trinity. More traditionally
crosses with spirals on the end are used for the top as well as chrysanthemum
flower shaped dough for fertility, and a good harvest. I'm not so thrilled with
how my design held shape but I will work on that next year.

My Final Bread
IMPROVEMENTS 2017:

 To also note I've made some improvements to this recipe (It's already changed above). In 2017 I'm having much better results with it so if you are using my modified recipe it should turn out good for you. Please do stay away from Martha's recipe as well as the standard one on the internet, I've heard A LOT of internet feed back surrounding these recipes from people who have spent hours baking bread and the consensus is the flour ratios are off. Most people get bread that is simply to hard to eat after hours of work which is really sad. Mine should work out just fine for you just make sure you are using the right yeast Dry Active Yeast (none of that "quick rise" stuff Paska takes time and rise of the bread is a very big part of the process) Hopefully if you are starting out you can skip the part where you get a bad recipe. That is my hope for you.
These were my 3 results this year. I'm slowly getting better.
If you are interested in learning more about the breads in Ukraine
or would like to see more samples of ornate traditional breads. Check out the
following YouTube videos. One is a museum traditional bread exhibit, the other
is longer, and in Ukrainian (so again only if you are really interested) and
features examples of how traditional bread is made and some of the rituals
surrounding bread.
Bread Exhibit: http://www.youtube.com/watch?v=cg8S1ZmiOeY
Bread Ukrainian Video: http://www.youtube.com/watch?v=9haNHtMfCl8
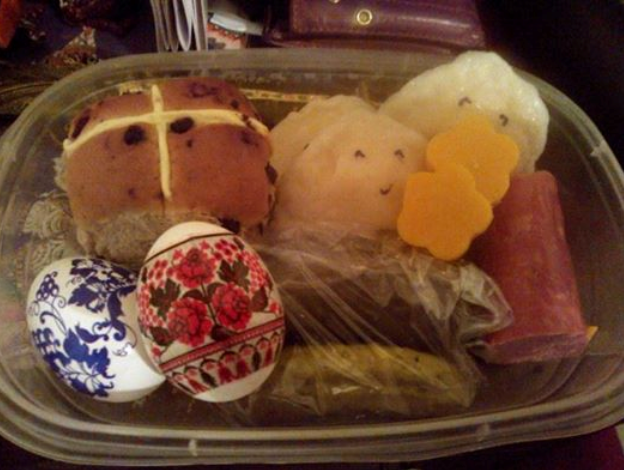
My Easter basket is coming along nicely but there is an important
part of making it coming up.... that is tasting everything to make sure you
don't poison someone of course, it is your duty as a cook. I made us up some
nice lunches in the style of "Japanese bento" as a preview of our
Easter basket and to make sure that everything we have made is a good enough
quality to put in the Easter basket. This is what Bento would look like if they
were made by Polish and Ukrainian people. I put faces on the Perogies and cut
the cheese into flower shapes and decorated some eggs for lunch, the bakery
also had a deal on hot crossed buns.... and since I have been working so hard
at this Paska I figured it was ok to let someone else do the baking this time
and enjoy some Easter Treats.
Easter Lunch Box Bento
No comments:
Post a Comment